

How to Install Pediments and Pilasters: Door, Fireplace and Window Surrounds
A pediment over a door with a pilaster on each side is the classic door surround. It makes a plain entry, fireplace or interior opening look built in. Spectis pediments and pilasters are molded high density polyurethane (HDP), shipped primed and ready for paint, and they are cut and fastened much like wood trim. This guide covers the pediment styles Spectis makes, how to size a pediment and pilasters to your opening using the Spectis entrance system chart, where a surround works indoors and out, and how to install one.
What a Pediment Surround Is
A Spectis entrance system has three parts:
- Pilasters are the flat vertical pieces on each side of the opening. Spectis sells them in pairs.
- A crosshead is the horizontal header that spans the tops of the pilasters.
- A pediment is the decorative top that sits above the crosshead: acorn, peaked, rams head or sunburst.
The catalog notes that pediments and crossheads can be ordered separately or together, and every part is sold separately. All of it is decorative. None of it carries the wall, so it never replaces a structural header.
Spectis Pediment Styles
- Acorn (AP): sloping moulded cornices with a center acorn finial. Six widths from AP5315 (53 3/4") to AP9823 (98 1/2"). Acorn pediments
- Peaked (PP): a straight triangular gable, 4" projection. PP5314 to PP9825. Peaked pediments
- Rams head (RH): a scrolled "broken" top, 6" projection. RH5319 to RH9826. Rams head pediments
- Sunburst (SP): a fan inside the pediment. SP5315 to SP9825. Sunburst pediments
- Crossheads: with trim strip (CHT, 9 1/4" high), extended trim strip (CHT, 11" high) or dentil (CHD, 9 1/4" high), all 4" projection. Crossheads
The Pediments category also carries pieces that are not part of the chart: the PD3643 and PD25102 peak pediments, the PWH4421 peak window header, the SPM5119 sunburst half-arch pediment, and the WH34-100 window header. Size these from their own drawings.
Where to Use a Pediment and Pilasters
- Front door surround. The main use. The chart below is built around a door opening.
- Fireplace mantel surround. Fireplace pilasters each side of the firebox with a crosshead or pediment above. Keep all trim outside the clearances your fireplace manufacturer and local code require for combustible trim. We could not find a published Spectis heat rating.
- Interior doorway. Dresses a hall, dining room or office opening. The same chart applies.
- Window head. A pediment or crosshead over a window, with or without pilasters.
- Built-ins and bookcases. Pilasters on the face frame and a crosshead across the top. Shorter pilasters such as PL755F (55") and PL960F (60") suit cabinets and wainscot height.
- Niches and openings. Frame a niche or cased opening the same way you would a door.
- Garage and side entries. The wider rows of the chart cover openings up to 84 3/4".
How to Size a Pediment to Your Opening
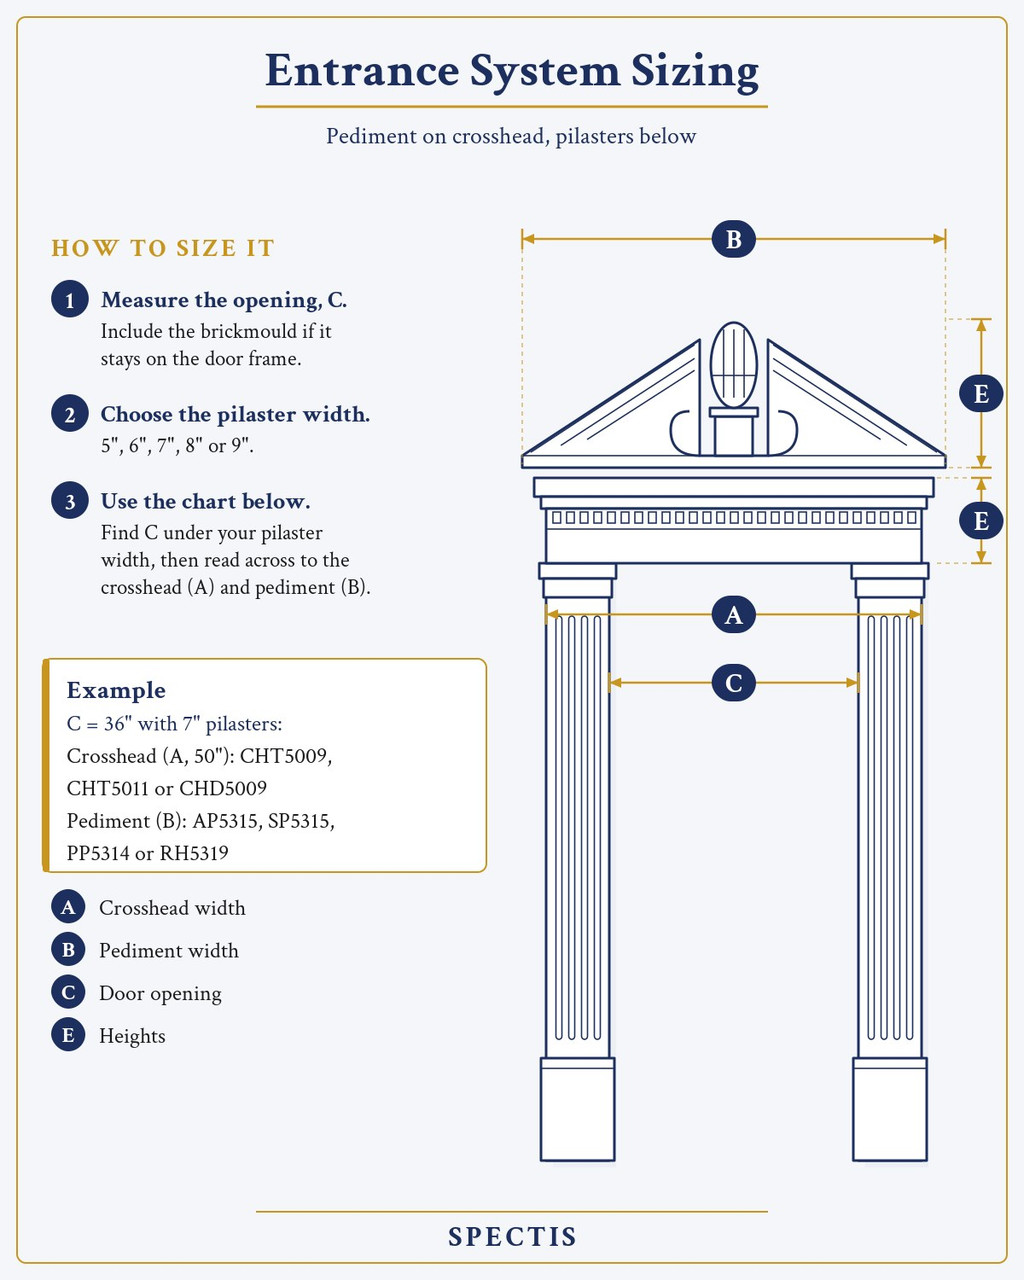
Spectis sizes the whole surround from one number, the "C" dimension: the width of the door opening. If the brick mould stays on the door frame, include it. Then:
- Measure the opening ("C"), including any brick mould or casing that stays.
- Pick the pilaster style and width (5" to 9").
- In the chart, find your C dimension under that pilaster width, then read across to the crosshead and pediment for that row.
The crosshead width ("A") equals the opening plus both pilasters: a 36" opening with 7" pilasters needs 36 + 7 + 7 = 50", so the first row applies. That is the catalog's own example: with C = 36" and 7" pilasters you can choose a CHT5009, CHT5011 or CHD5009 crosshead with an AP5315, SP5315, PP5314 or RH5319 pediment. The pediment's base width ("B") runs a little wider than the crosshead so its mouldings overhang the header. The catalog diagram labels these the same way: C is the door opening, A the crosshead width, B the pediment width, and E the heights of the crosshead and the pediment.
Pick your opening, then your pilaster width
| 5" pilasters | 6" | 7" | 8" | 9" | Crosshead (A) | Pediments (B width) |
|---|---|---|---|---|---|---|
| 40" | 38" | 36" | 34" | 32" | 50" CHT5009 · CHT5011 · CHD5009 | AP5315 53 3/4" SP5315 53 1/8" PP5314 53 1/2" RH5319 53 1/2" |
| 44" | 42" | 40" | 38" | 36" | 54" CHT5409 · CHT5411 · CHD5409 | AP5716 57 5/16" SP5716 57" PP5715 57 5/16" RH5718 57 9/16" |
| 56" | 54" | 52" | 50" | 48" | 66" CHT6609 · CHT6611 · CHD6609 | AP7018 71 1/8" SP7018 73 3/8" PP7018 70 5/8" RH7022 70 11/16" |
| 71" | 69" | 67" | 65" | 63" | 81" CHT8109 · CHT8111 · CHD8109 | AP8421 85" SP8423 83 13/16" PP8421 85" RH8424 84" |
| 76 3/4" | 74 3/4" | 72 3/4" | 70 3/4" | 68 3/4" | 86 3/4" CHT8609 · CHT8611 · CHD8609 | AP9023 90 1/2" SP9021 89 13/16" PP9023 90 1/2" RH9024 90" |
| 84 3/4" | 82 3/4" | 80 3/4" | 78 3/4" | 76 3/4" | 94 3/4" CHT9409 · CHT9411 · CHD9409 | AP9823 98 1/2" SP9825 98" PP9825 98 1/2" RH9826 98" |
Widths and heights are from the Spectis entrance system chart (catalog page 114). A few product titles on this site differ slightly from the chart. Check the product drawing before ordering, because every piece is made to order and nonreturnable.
Heights matter too. Most pilasters are 90" tall and are cut from the bottom so both tops land level with the top of the door frame. Tall doors and two-story entries use the 96" to 120" pilasters. Pediment heights run from 14 1/2" to about 25", so leave that much wall above the crosshead.
Choose the Pilasters
Spectis pilasters are sold as pairs. The chart sizes are 5" to 9" wide, mostly 90" tall with a 2 1/4" projection:
| Style (90" tall, 2 1/4" projection) | 5" wide | 6" wide | 7" wide | 8" wide | 9" wide |
|---|---|---|---|---|---|
| Fluted | PL590F | PL690F | PL790F | PL890F | PL990F |
| Single panel | PL590P | PL690P | PL790P | PL890P | PL990P |
| Double panel | PL590DP | PL690DP | PL790DP | PL890DP | PL990DP |
Other options include the 7" PL1144L/PL1144R long pilasters (sold singly, one per side), 11" single panel (PL1190P), smooth (PL793SM), taller fluted (PL696F, PL7102F, PL6108F, PL11108F, PL18120F), and narrow mull pilasters (PL284F, PL284P) for between windows. The PL6108 and PL5108 long pilasters come with a separate plinth block. Browse fluted, single panel, double panel and mull pilasters.
How to Install a Pediment and Pilasters
The full Spectis method for pilasters and the crosshead is in How to Install Crossheads & Pilasters, and centering a pediment is covered in How to Install Spectis Pediments and Keystones. In short:
- Dry-fit everything. Lay out the pilasters, crosshead and pediment and confirm every centerline before any adhesive goes on.
- Cut the pilasters to height. Measure from the top of the door (including brick mould) to the landing or floor, and cut the extra off the bottom so both tops are level. If a plinth block is separate, bed it to the pilaster with PL Premium and screw it through the back.
- Set the pilasters. Run a 1/4" bead of PL Premium (PLP100) on the back, press each one in place and check for level. Fasten with exterior-grade screws countersunk about 1/8", at least six per pilaster: two at the top, two in the middle and two at the bottom, about 3/4" in from the edge.
- Set the crosshead. Bed it with PL Premium, center and level it over the door and pilasters, and fasten with at least six screws into framing. Over vinyl siding, Spectis recommends letting the siding sit in the J-channel behind the top of the crosshead.
- Set the pediment. Mark the centerline on the wall and on the back of the pediment, bed it with PL Premium, line up the marks and screw it into solid framing or blocking.
- Finish. Let the adhesive cure, fill fastener holes and joints, sand, and paint.
Spectis requires PL Premium on all bedding faces and butt joints; other adhesives can attack the urethane. Nails, screws and adhesive are sold separately. See why Spectis specifies PLP100.
Interior vs Exterior
Interior and exterior pieces are the same material. Spectis urethane has a closed-cell structure that will not rot, and Spectis notes that properly coated products are not affected by UV.
- Outside: use exterior-grade stainless steel screws or nails and exterior-grade filler, and seal the joints. Paint is what takes the weather, so paint promptly with a quality exterior latex. See Painting factory-primed Spectis millwork and Finish Spectis urethane products.
- Inside: the same adhesive and fastening steps apply. Fasten into studs or blocking rather than drywall alone, then fill, caulk and paint with an interior latex.
Frequently Asked Questions
How wide should a pediment over a door be?
Wide enough to cover the crosshead, which is the door opening plus both pilasters. For a 36" opening with 7" pilasters, that is a 50" crosshead and a pediment around 53 1/2". Use the chart above.
Do I need a crosshead under the pediment?
Yes. In the Spectis entrance system the pediment sits on top of the crosshead, and the crosshead sits on the pilasters. Each pediment is sized to its matching crosshead, though the two are ordered separately.
Can I cut pilasters to length?
Yes. Cut from the bottom so both tops are level at the top of the door frame.
Are pilasters sold in pairs?
Yes. The Spectis catalog lists pilasters as sold in pairs. The exception is the 7" PL1144L and PL1144R long pilasters, which are sold singly: one left side and one right side.
Can I use fireplace pilasters and a pediment around a fireplace?
Yes, as decorative trim, provided it stays outside the clearance to combustible trim that your fireplace manufacturer and local code require.
Is a pediment structural?
No. Spectis pediments, crossheads and pilasters are decorative and do not carry the wall.
Build Your Surround
Start with the opening, pick the pilaster width, and the chart gives you the crosshead and pediment. Shop Spectis pediments and Spectis pilasters, or browse all entrance and window systems.
Recent Posts
-

How to Install Pediments and Pilasters: Door, Fireplace and Window Surrounds
A pediment over a door with a pilaster on each side is the classic door surround. It makes a plain e …Oct 9th 2026 -

How to Install Decorative Half-Round Arch Trim
A half-round arch over a window or doorway is one of the quickest ways to make an opening look built …Oct 9th 2026 -
How to Choose and Size a Gable Vent
A gable vent sits in the peak of the wall under the roof and adds character as much as airflow. Here …Oct 8th 2026