

How to Install Decorative Half-Round Arch Trim
A half-round arch over a window or doorway is one of the quickest ways to make an opening look built-in. Spectis arch trim is molded high density polyurethane (HDP), shipped primed and ready for paint, and it is handled the same way as wood millwork. This guide covers how to choose the right arch for your opening, which straight casing matches each profile, and how to install arched window trim indoors and out.
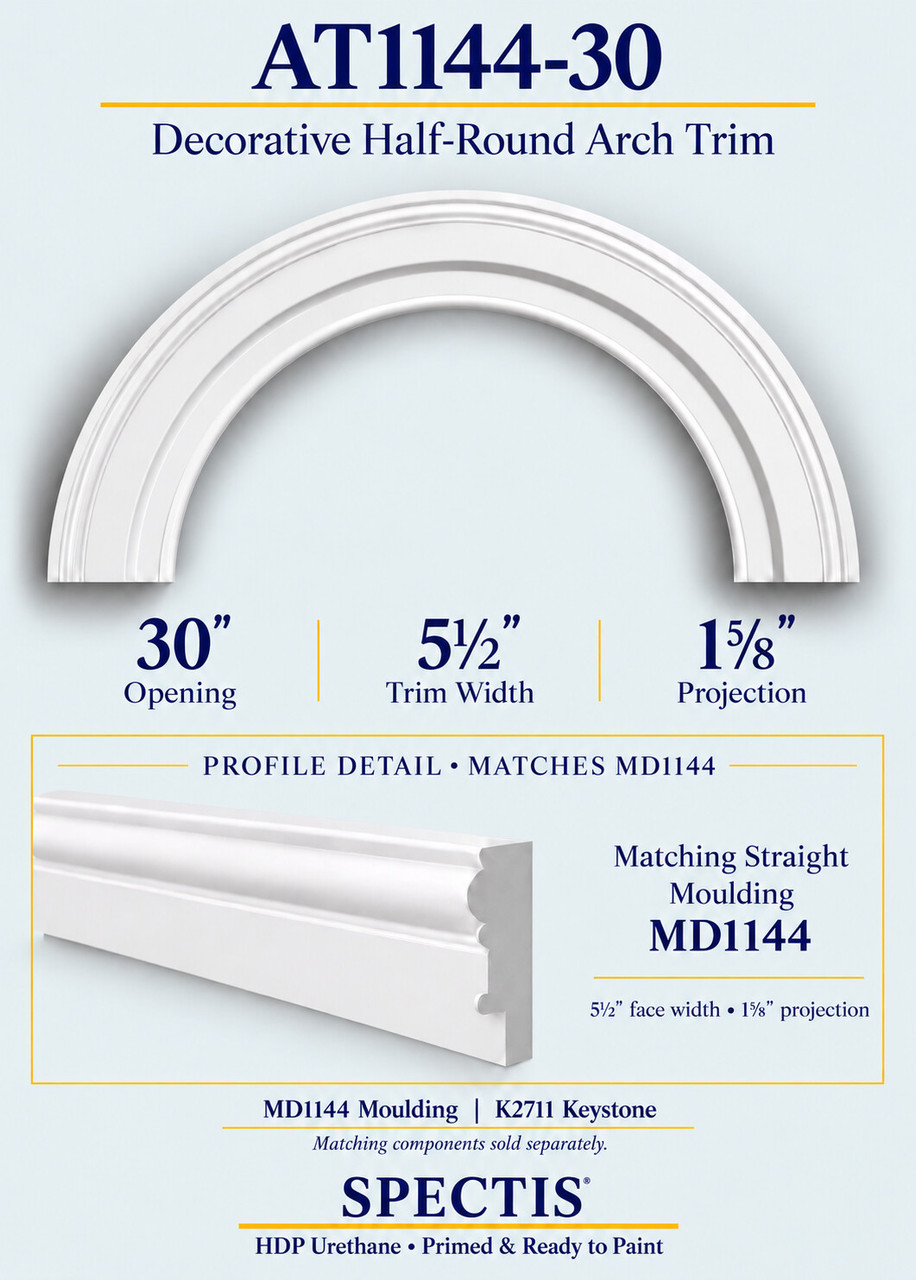
What Arch Trim Is (and What It Is Not)
Arch trim is curved casing that frames the half-round top of a window or door. It is decorative. It does not carry the wall, so it never replaces a header or framing. Each arch is molded when you order it, which means it is made to order and cannot be returned. Confirm your size before you buy.
Step 1: Measure the Opening
Every Spectis arch is sized by its inside diameter: the distance between the inner edges of the arch at its base. An AT1144-30, for example, fits a 30" half-round opening. The 30" is not the overall width. With 5½" of trim on each side, that arch measures 41" wide and 20½" high overall.
- Measure the width of the half-round opening at the spring line, the horizontal line where the curve begins.
- Measure where you want the inside edge of the trim to sit. If the trim will cover existing casing or a reveal, plan for that before you order.
- Check the product drawing (linked on each product page) against your opening before ordering.
Step 2: Pick a Profile, Then Match the Straight Casing
Most Spectis arch profiles are offered for the same set of openings, so you can choose the look first and the size second. Each arch profile has a matching straight moulding that carries the same face and projection down the sides of the opening. The keystone is an optional center accent. Matching trim and keystones are sold separately.
| Profile | Style | Face width | Projection | Matching straight moulding | Catalog keystone |
|---|---|---|---|---|---|
| AT1011-3.5 | Smooth flat | 3½" | 1" | MD1011-3.5 | K2729 |
| AT1011-5.5 | Smooth flat | 5½" | 1" | MD1011-5.5 | Ask us |
| AT1011-7.5 | Smooth flat | 7½" | 1" | MD1011-7.5 | Ask us |
| AT1025 | Moulded, shaped edges | 5½" | 1⅝" | MD1025 | K2703 |
| AT1144 | Moulded, rounded bands | 5½" | 1⅝" | MD1144 | K2711 |
| AT1365 | Wide moulded | 10" | 2½" (catalog) | MD1365 | Ask us |
Arch Trim Size Chart: Pick Your Opening, Then Your Profile
Find your opening in the left column, then pick a profile across the row. Every link goes to that exact arch. The overall width of each arch is the opening plus two face widths (for a 5½" profile on a 30" opening, 30 + 5½ + 5½ = 41").
Spectis also makes a few single-size arches for specific openings:
- AT1068-37: 37" opening, 4¼" casing; catalog match MD1068
- AT1068-48: 48" opening, 4¼" casing; catalog match MD1068
- AT1069-36: 36" opening, 2" casing; catalog match MD1069
- AT1069-72: 72" opening, 2" casing; catalog match MD1069
- AT1071-20: 20½" opening, 3⅜" casing; catalog match MD1071
- AT1458-48.5: 48½" opening, 5½" casing; catalog match MD1458
- AT1610-71.5: 71½" opening, 3½" casing
Browse every size and profile in the arch trim category.
What You Will Need
- Tape measure, pencil, level and framing square
- Standard woodworking tools: a miter box and hand saw or a power miter saw
- Drill with countersink bit
- Caulk gun and PL Premium adhesive (PLP100)
- Corrosion-resistant exterior screws or finish nails long enough to reach framing
- Filler for fastener holes, fine sandpaper and a quality latex paint
Nails, screws and adhesive are sold separately.
How to Install Arch Trim, Step by Step
- Prepare the surface. The wall and the back of the trim must be clean, dry and free of oil or dust. Spectis recommends surface temperatures above 40°F when using the adhesive.
- Mark the spring line and center. Draw a level line across the opening where the curve starts, and mark the center point of the arch. These two marks set the arch and the side casings.
- Dry fit the arch. Hold the arch in place with its inside edge aligned to the opening and its ends on the spring line. Check that it is level side to side and centered.
- Cut and dry fit the side casings. Cut the matching straight moulding to run from the sill or floor up to the ends of the arch. Spectis polyurethane cuts with standard woodworking tools. The arch ends meet the legs with square butt joints at the spring line; check the fit carefully, since the profiles must line up. (Confirm on the product drawing how the arch ends are finished before cutting.)
- Bed the arch. Run a continuous bead of PL Premium on every edge and face that touches the wall. Press the arch into position.
- Fasten into framing. Pre-drill and countersink, then drive corrosion-resistant screws or finish nails through the face into framing while the adhesive sets.
- Install the legs and glue every joint. Bed the side casings the same way, and put adhesive on the butt joint where each leg meets the arch. Spectis requires its adhesive on all bedding faces and butt joints.
- Add the keystone (optional). Center it at the top of the arch and bed it in PL Premium.
- Clean up and fill. Wipe squeeze-out right away. Once cured, fill the fastener holes, close any joints with PLP100 and sand flush.
- Paint. The trim is already primed, so do not prime it again. Wipe it clean and topcoat with a quality latex paint.
Interior vs. Exterior Arch Trim
Spectis uses the same material inside and out, so the arch you choose works for either. What changes is the finish work.
Interior arch molding
- Fasten through drywall into studs or framing; finish nails are typical for interior casing.
- Fill holes, sand, and paint to match your other trim.
Arch trim exterior
- Install over a finished, weather-tight wall, and use corrosion-resistant (stainless or zinc-plated) fasteners matched to the substrate.
- Seal every joint and the bedding edges with PL Premium; it is waterproof and paintable. Seal the top edge against the siding so water cannot sit behind the trim. (General exterior trim practice; confirm details with Spectis for your siding type.)
- Paint promptly. Outside, the paint is what takes the weather. The Spectis warranty is five years when the product is painted right after installation, and one year if it is not.
- Choose lighter colors. Spectis does not recommend black, dark green or dark blue on rigid polyurethane, because dark colors cause extra expansion and contraction and void the limited warranty.
Arch Trim FAQ
Does the size mean the overall width?
No. The number is the inside diameter of the opening. The overall arch is wider by two trim widths.
Are the straight casing and keystone included?
No. Each arch is sold alone. The matching straight moulding and optional keystone are ordered separately.
Can I use any construction adhesive?
No. Spectis specifies PL Premium (PLP100). Other adhesive chemistries can attack the polyurethane.
Can I use half-round window trim outside?
Yes. Spectis arch trim is used inside and out. Outdoors, seal the joints, use corrosion-resistant fasteners and paint promptly.
Can I return an arch if it does not fit?
No. Arches are molded to order and are nonreturnable, so check the drawing against your opening first.
Find the Right Arch for Your Opening
Know your opening? Start with the chart above, or browse every profile and size in the Spectis arch trim collection. Each product page also shows the other profiles made for the same opening, so you can compare styles side by side. For related reading, see why Spectis specifies PLP100 adhesive and painting factory-primed Spectis millwork.
Recent Posts
-

How to Install Decorative Half-Round Arch Trim
A half-round arch over a window or doorway is one of the quickest ways to make an opening look built …Oct 9th 2026 -
How to Choose and Size a Gable Vent
A gable vent sits in the peak of the wall under the roof and adds character as much as airflow. Here …Oct 8th 2026 -
How to Choose Polyurethane Balusters for a Porch or Deck
Balusters carry the look of a railing, so it pays to choose the profile and size before you order. H …Oct 8th 2026